Monday, October 19, 2020

This Little Light of Mine!


She's all dressed up for the party and holding the lite up candle!  Happy the Dragon Polymer stamp set combined with an interactive light mechanism on the face of a greeting card is placed front and center for everyone to see her splendor.

Happy Friday Friends! 

Watch me create todays project on Youtube or FB!  

Here's a short video with the Lite up interaction 


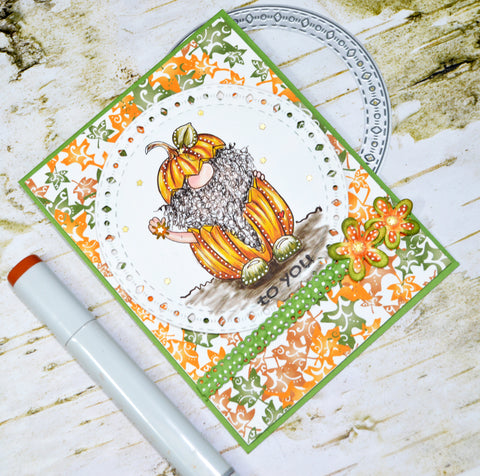
Guess what's new in the TLCDesigns.shop?  It's Happy!!!  The most adorable pudgy little dragon Polymer Stamp set called Happy!  He's simply the happiest!  The 3" x 4" set comes with two extremely generic sentiments (the Hi fits inside the balloon even!!!), three or four small accessory stamps and Happy! 


A girl dragon or a boy!  It really is diverse with the little party hat or bow tie!!  Make an entire bundle of balloons because they are separate stamps!!  Use one string with three balloons while you mask them off, it's entirely up to you! 


On last nights FB LIVE, I combined and assembled the easy to use Pear Blossom Press EZ-lite mechanism (complete set of three with batteries) with the Happy stamp and a die cut candle from the Celebrate Frame Die Set!  


The card frame is one of the exquisite new store starter dies called Butterfly Rectangle Frame Die.  It comes with a frame die that has a cut-less edge to place on the score line of a card and it creates the entire card.  Then the second frame size down has beautiful slots on the edge, a beautiful faux stitch line and valiant looking marquis on each corner too! 


The Push button for the mechanism was covered with one of the petal free flowers from the Oval Lily Frame die set also available at TLCDesigns.shop

I hope you enjoyed the project and stop in to say hi on my weekly FB Live Crafty hour! 

Stay Crafty,

Autumn Colored with Gilding Flakes


Find my Assembly video for this project on my Youtube Channel here


On Thursday's at 8pm EST I roll out the inks, papers, stamps and dies and sit in the studio to prepare my weekly hour of sharing.  A few weeks ago, I decided to get out some oldies but goodies which included the Gilding flakes and stencils.


The Apple A Day Die set has a very nice sized ornate frame die that creates a beautifully sized background for any smaller frame or shaped die to layer with. 


The design paper is centered with a red card stock and an additional frame is cut in black to be placed just to the left off center.   This process enables all of the contrasting colors to appear but also gives an elegant style to the project as well.


The focus image will be the embossed "THANKS" from the EZ Salutations stamp set centered onto the second largest frame in the Tiny Vine Die set after using a stencil and some Stazon inks on the white card stock.  


After the focus point of the project is done, I cut two of the larger dies in the Tiny Vine Oval Die set once in red and once in black and again put the red centered behind the white oval then offset the black in the opposite direction than before.   The project is now symmetrical in color and in style.


The final process in this project is to put a piece of double sided sheet onto some white card stock and die cut the Star Spangeled Confetti die.  Once the die is cut, take off the protective cover revealing the adhesive.  Time to get out your gilding flakes!  I placed gold on one of these stars and some mixed flakes on the other star.  Rub and burnish them into the adhesive and the star is placed between the two layers of contrasting frames.  A bit of Autumn peaking out from the Thanks project and it is completed with a bit of ribbon on both layers!  

I hope you enjoyed the project, wanna give it a try, feel free to check it all out on the You tube channel above and I hope you visit next Thursday! 

Stay Crafty,

Jack O' Gnome for the WIN!

It's a Contest!  Color up the freebie from TLCDesigns.shop digital stamp called Jack O'Gnome.  Make a project and enter with #tlcpumpkingnome and WIN!


It's time to play along and WIN!

Grab your freebie digital illustration set called Jack O' Gnome from the TLCDesigns.shop and get to creating!  Post a pic on FB or IG with the hashtag #TLCpumpkingnome and we will draw the winner of a $10.00 store gift certificate!

Cute little greeting card to YOU!  Jack O'Gnome free digital stamp from TLCDesigns.shop is on center display in this project full of fall colors Orange and Green

The file has papers, sentiments and some super cute silhouette images too along with Jack of course!
This project was designed on last Thursday night's FB Live on TLC Designs FB page.

full fall color display of Jack O'Gnome free digital stamp in the center of the greeting card project designed with products from TLCDesigns.shop paper crafting store.  Aztec sunshine circle is his comfy spot in the center of the project.  Highlighted with the beautiful design paper included in the free file!  The celebrate ribbon and some flower finish the project off perefectly.

I used the design paper in the kit along with the image.  Combined with the following die sets also available in the store:  Celebrate Ribbon Die, flowers from the Oval Lily Frame (distressed a bit) and the stunning Aztec Sunshine circle die! 

It's Jack O'Gnome free digital stamp image in all his glory closeup and friendly in his pumpking costume ready to hand you his flower.  To You.  decorated with spots and dots, he's perfect for any Halloween greeting card

I added a few little sparkly stars and a flower die cut in his hand.  A bit of gel pen dots in highlighted places and he's complete!  The project was fun, quick and inspiring to design with all my wonderful friends on FB Live!

Stay Crafty,

Wink for a minute with Wanda Digi Stamp!


Hi Friends, It's Sunday and I'm sharing a project from one of the You Tube Live shows I do on Thursday Nights at 8:00 pm EST!

Do you use Digi's?  Have you ever tried them?  Today I'm going to explain some of the things I personally like about digi's with you.  I don't speak for anyone else, these are just my opinions. 

So today I want to share some of the digi PRO'S I've come across, with all of my crafty friends. 

Digi's don't take up storage space
Digi's go everywhere your computer goes
Digital image sizes can be adjusted according to your needs
Digi's can be combined with other digi's before printing with no masking
Digital images can be flipped adjusting the orientation or direction
The price point of digital images are lower in general
The digital images are immediately delivered and there is no shipping cost

There are things about digital stamps that are a bit limiting.  However, all in all, they work wonderfully for me and the designer papers are the same as illustrations.  

I hope if you have NOT given them a chance, that this information will be considered and perhaps prompt you to give it a go! 

She's sassy and flashy and so very sweet!  It's Winking Wanda digital image colored in pinks and blues!  Place in the center of a band card for TLCDesigns.shop Papercrafting store
INGREDIENTS:

I love rubber/polymer stamps and digital images alike!  


I illustrated "Winking Wanda" with her cute little chubby face, wispy feathers and that little signature heart when I opened my e-commerce store TLCDesigns.shop in January 2020.  She was one of my first and quickly became a favorite!  


 This card is not the average A2 size card.  

I created this card with flaps that close over the front and the Acetate that wraps around the card and keeps the project closed.  On top of the acetate, I attached the little scalloped circle die with the cute digi image colored for a topper!  I stamped the Whimsy Stamps sentiment inside the card and secured the topper to a card base.  That's it!  Simple and Special!

Stay Crafty,

Can your sealife swim?


Happy Monday Friends!  Two weeks ago on my FB Live I created this cute little Interactive project with some of the newest products in the TLCDesigns.shop.  Step by step we make it together and I finish it up to show you today!  


You can watch the entire crafting time TODAY on my Facebook Page!  Be sure to subscribe to continue seeing what I make and ring that bell as it's very important to keeping content live!  Thank you! 


The project was simple and quick to make.  The coloring was done digitally and I printed the illustrations out onto Neenah paper and fussy cut them.  I distressed over the white Neenah paper with Ranger Distress Ink and was ready to get onto the card topper.

INGREDIENTS:
Sea Horse Samm and Friends digi pack


The NEW Sea Scene digi designer papers at the TLCDesigns.shop store gave me the entire background with just a click of the print key.


Don't enjoy putting the time into the background?  Are you unable to make a background that you're happy with in the end?  The full Scene digi designer paper is perfect for you!  Choose and Print!  Adhere it to your topper paper and that's it!  


Just look at all that glossy gorgeousness!  The Puffer fish looks so realistic and mystical at the same time!  I love this image!  


On the inside, I printed another sheet of the digi designer paper call Sea Scene and taped it down.  The sentiment comes in the Sea Horse Samm digi pack.  I assembled the Double Dial Die mechanism and the topper was popped up onto the card base!  The project was finished!  I hope you try the dial die interactive motion for yourself and see just how easy it is to bring your project to life! 

Stay Crafty,

It's a Celebration Invitation

  It all starts today at 4PM EST! Click on photo to go now Be sure and get social so you don't miss out!  Here are some links to keep up...